


I have a friend who harvests seeds from every fruit or vegetable she eats, and plants them. She now has a beautiful greenhouse, selling her produce to others. The best thing is she has a little estate, not a farm, and plants grow everywhere, including her front porch.
This style of garden is efficient and sustainable, by following a few guidelines. Seeds are quickly harvested from young, mature fruits on most fruits and vegetables.
You want to make sure, if possible, that the fruit from which you harvest is an heirloom variety, so the seeds are true and viable. Most heirloom seeds only need to be dried, labeled, and properly stored for next year in an envelope or sealed container placed in a cool, dark place. Many plants have some extra steps, so read on below for those informations.
1. Tomatoes
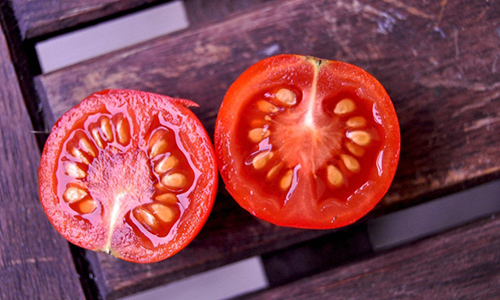
Tomato seeds need a little extra care before storing to extract the pulp. Start with a fully ripe tomato and scoop the seeds out, placing them in a clean container. Fill the jar with water, cover with a lid and permit fermentation of the seeds. Remove the seeds several times a day before the seeds fall to the jar bottom and the pulp rises to the top. It takes between 5-10 days.
Skim off the pulp and apply a strainer or cheesecloth to the seeds. Place the seeds in a well ventilated area to dry in a single layer on paper towels. The seeds should be dry and ready for stocking in around two weeks.
2. Cucumbers
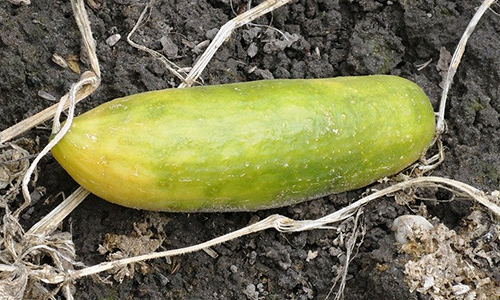
Choose Cucumbers from the best open-pollinated heirloom plant when harvesting cucumber seeds. Leave the cucumber to mature on the vine. It turns yellow and becomes soft. Slice the cucumber down the long center and scoop the seeds out as soon as you pick it.
If you have bought the cucumber, leave it on the counter to ripen and turn yellow like it does on the farm, then scoop the seeds to ferment and save.
In a glass jar or bowl, ferment the seeds, covered with warm water. The seeds will at first float, but later sink. Fermentation removes the gel sac around the seeds and helps destroy any pathogens that may damage the seeds. Soak the seeds away from direct sunlight, for three to four days.
The seeds that sink into the jar’s bottom are ready for harvest. Dispose of any seeds and pulp that float on top of the water. Strain the seeds through a fine mesh sieve or cheesecloth and rinse away any remaining gel sac. Spread the seeds onto a piece of paper towel and set aside to dry for a few days.
Keep them out of the sun until thoroughly dry, usually for four or five days, and then store them in a seed envelope or a small glass container. Mark the container and put it in the freezer, where necessary, to kill any bugs or diseases that survived fermentation for a few days. Store the seeds in labeled, cool, dry, dark place.
Related: Where to Find Seeds if it’s Off the Shelves Right Now
3. Potatoes
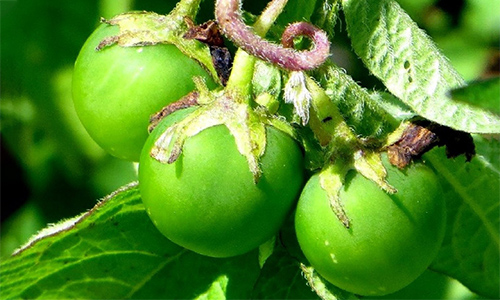
Most potatoes are produced from seed potatoes, but they can be grown from seed. Potatoes do not always yield seeds but may have enough pollination from bees when the weather is mild.
The plant should grow a small fruit or berry resembling a small tomato. The ripe fruits are often green, or purple. They are somewhat toxic and not edible but can contain several hundred potato seeds in every berry.
If your potato plant produces berries, also called “seed balls”, you can harvest the seeds by leaving the berries on the plant, until they are completely ripe and very soft. Squeeze the seeds out of the berries and wash them with a mild detergent to eliminate the germinating inhibiting compounds. Dry the seeds for storage, and plant them as you would a tomato seed when they are ready, starting them indoors early.
4. Onion and Garlic
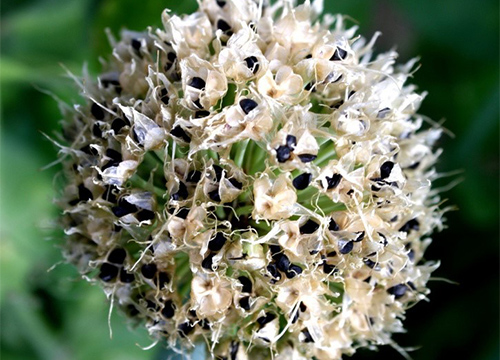
Most gardeners take out their onions long before the plant begins blooming. But if you leave, seeds will eventually be harvested for later planting.
The first aspect to harvesting onion seeds is the selection of a non-hybrid or heirloom onion variety. Another factor is that the onions are biennials, meaning during the second year they grow flowers and seeds.
If the ground in your area freezes in winter, you’ll need to dig up the onion bulbs and store them in a cool position during winter time. Then they replant in the spring. The plant will send a flowering stalk up after the leaves have regrew.
When the flowering heads turn brown, it is time the seeds were harvested. Remove the flowering head by clipping a few inches under the head with shears. Place them in a paper bag, and allow them to dry for several weeks in a cool, dry place. When drying the flowering heads shake off the seeds. Store them in a cool dry spot, labeled out.
In the same manner, garlic seeds are harvested, allowing the scapes to bloom and produce seed.
Related: 47 Gardening Hacks
5. Carrots
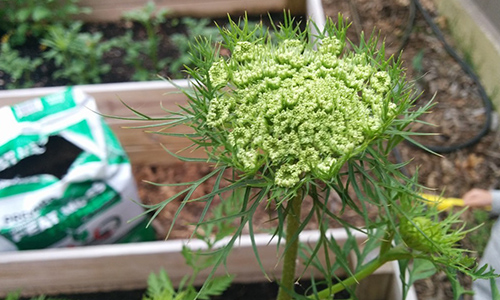
In their second year, carrots flower, and if you want to pick carrot seeds, leave the best carrots in the field at the end of the first year and thin them to 3 inches apart. Remove dead and damaged leaves in the spring of the second year, but avoid using insecticides. The flowers are pollinated by bees and flies which can be harmed by insecticides.
Watch the plant closely for seed production after the flowers show up and are pollinated. When they turn brown and loosen from the umbels, the seeds are mature and ready for harvest. They are staying on the plant because of the small hooks which keep them in place. Cut the seed stalk and position them upside down in a paper bag when around 80% of the seeds are mature. Leave them up several days to dry.
Shake them when the stems are dry, to release the seeds into the jar. Place the seeds in refrigerator in a jar with a tight-fitting lid.
Related: What is Hydroponic Gardening?
6. Asparagus

If you have asparagus plants in your garden, both male and female, you may notice asparagus seeds during fall. In small berries, the seeds grow which turn dark red when they mature. Though asparagus is typically grown from crowns, these seeds are fertile and, when properly collected, will germinate in your garden.
When the berries turn bright red, and the tops start falling over, cut off the plant’s leafy tops. Hang the tops upside down over a bowl or tray in a warm , dry room for about a week, until the berries on the surface start to dry. The bowl will catch and berries that fall off.
When surfaces of the berry have started drying, pluck the berries off the stems of the plant. Place in a bowl of lukewarm tap water and soak for 1 to 2 hours. Break open the berries with your fingers and take off the seeds. Place the seeds into a cheesecloth-lined mesh sieve. Rinse it under cool water to remove any remaining berry pulp.
Pat the seeds with a paper towel and distribute them to dry on wax paper or parchment paper. Dry the seeds for about a week, turning them up once a day, until they are completely dry. Store the seed dried in a sealed jar containing silica gel to absorb excess moisture. Label the jar and store in a cool, dark place, or in the refrigerator until planting.
Related: How to Produce Indoor Hanging Food
7. Broccoli
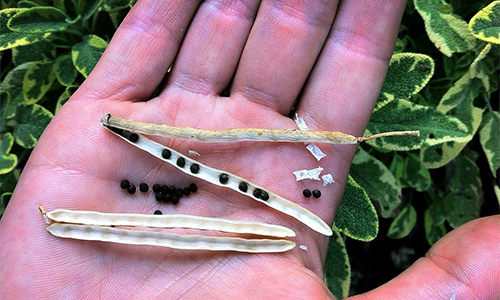
Broccoli is usually harvested before it seeds because once the flowering stalk appears the plant becomes bitter. If you leave it alone and let it bloom, however, the plant will yield a great number of seed pods.
When most seed pods have dried and turned brown, cut off the plant branches and allow them to dry in a paper bag even further. Remove the pod pieces once the pods are opened, and store the seeds in a cool dry place.
8. Zucchini
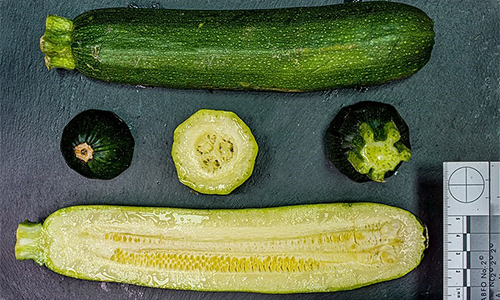
The zucchini seeds on your supermarket fruit are immature, but leave the zucchini on the plant for a few more weeks and you’ll have viable seeds for planting in the next few years. I suggest that at the end of the season you leave a few squashs on your most prolific plants. The squash grows big, and the skin is hardened. You will be able to dent the skin with your fingernail as soon as it is ready.
Cut the zucchini lengthwise, and scoop out the seeds. To remove extra pulp, rinse the seeds in warm water and scatter them over wax paper or parchment paper to dry. Put them for a week or so in a well ventilated area, stirring them regularly so that they dry out evenly. Store the dried, labeled seeds in an airtight container and place them in a cool, dark place until they are ready for planting the next spring.
If you follow the steps I outlined here, you should have a steady supply of seeds for your garden. Start with heirloom fruit for best results, and plant it away from other varieties that might cross them. You want true seeds that will produce healthy, productive plants.
If you don’t have fruit that is heirloom, plant what you have and produce the healthiest plants you can. Plant more than you think you’re going to need, because hybrid seeds are not true to the mother plant and may not produce well.
Learn how to grow a garden and save seeds now while the seeds are plentiful, and if they become scarce you’ll be prepared. Experience your garden, conserve your plants, and prepare for the unforeseen.


 for Kids")


