


Bringing baby chicks home for the first time is like Christmas morning for us homesteaders! There’s nothing cuter, fluffier, or funnier than new baby chicks. But as with most babies, they need specialized equipment. I’ve put together a list of the equipment you’ll need BEFORE you bring baby chicks home to ensure homesteader success!
Whether from your local farm goods store, Facebook, or a hatchery, Springtime means baby chicks! Whether you get your chickens for eggs or meat, baby chicks need special attention. They must be kept at a certain temperature, fed a certain feed, and be kept in a special brooder.
If you’re new to baby chicks, there are certain obvious things you need before you bring them home, and things you can do to make sure you’re prepared for the unexpected.
Items You Need To Raise Baby Chicks
1. Brooder Box
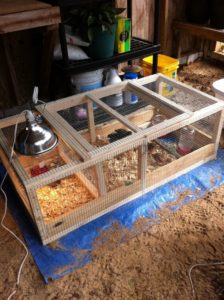
A brooder box can be as simple or complex as you want it. It can easily be a simple plastic container or tote, a large-animal water trough, or a hand-built wood box. The purpose behind the brooder is to keep your feathery friends contained. It should be small enough that they can huddle in together, but large enough to container their feeder, waterer and ideally be able to have half of it under the heat lamp, and half of it not. They will naturally move from the warm side to the cold as they need to, so being able to give them that option is awesome.
Please note that you have to be very careful about the type of plastic you use for your brooder box. You’ll have a heat lamp on them 24/7 for the first few weeks, and you don’t want a plastic that will melt. I’ve seen beautiful hand-built wooden brooder boxes with wire tops to prevent chicks from jumping out on Google. While these are beautiful, I don’t find them necessary.
Another thing to keep in mind is that they grow FAST. What seems massive one week will seem cramped the next.
2. Bedding
Chicks need to have a non-slippery surface, so their legs can grow straight underneath them. If your bedding is too slippery, you can use plastic textured shelf liner, pine shavings, newspaper, straw, etc.
Related: How to Plant and Grow Garlic
3. Heat Lamp
Baby chicks without their mama’s need to have their temperature regulated very carefully. New babies need to be kept between 95-100 degrees Fahrenheit. After two weeks you can begin reducing the temperature by 5 degrees every week.
To regulate their temperature, without having to crank the heat in the house, you need a heat lamp. I bought this one, and it worked like a charm: Brooder Heat Lamp. The best advice is to heat only half of the brooder box so that they can migrate back and forth between the heated and non-heated side to regulate their own temperature.
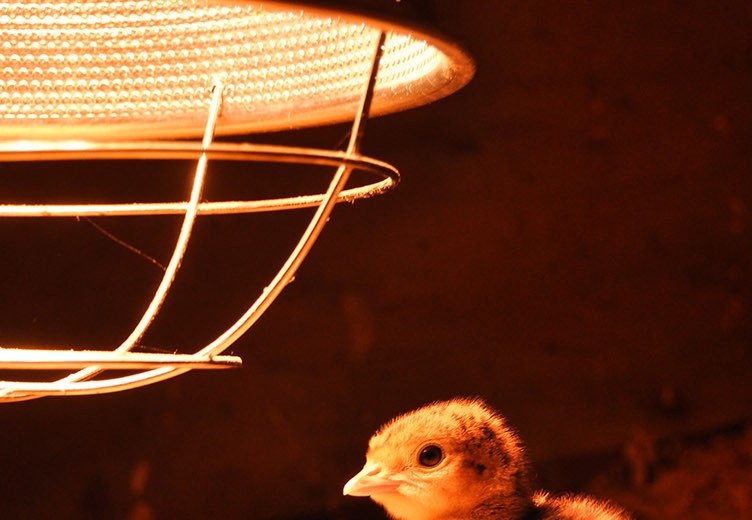
There are a few things you want in a heat lamp: the first is a red bulb. If baby chicks see any red on their fellow brooder-box-mates, they’ll begin to pick at it incessantly, hurting each other. If everything is cast in a shade of red, however, they won’t pick at each other.
The second thing to look for in a cage or bulb guard. If you bed your brooder box with wood shavings or even newspaper, and the bulb falls into the box, it could catch everything on fire.
The heated lap that I bought had a reflector, a cage, and a clamp that would like me to affix it to whatever I like. I attach it to a camera tripod which allows me to raise and lower it as well, which increases or reduces the temperature accordingly. We also have a digital thermometer that lets me easily tell what the temp inside my brooder box is.
Always buy a second bulb. We had one burn out in the middle of the night once and had to keep our chicks warm with a combination of central heating and a heating pad. Not the most efficient solution, but if you live off-grid, or don’t want to keep your entire house at 95 degrees, go ahead and buy that second bulb. It’s well worth it!
4. Poultry Fount
After you have their brooder box and heat lamp, you need a waterer for them. (Waterer’s not technically a word, but “poultry fount” sounds so formal). I like these: Threaded Poultry Fount Base. You screw on a wide-mouthed mason jar and invert it.
I love that you can throw them and the mason jars in the dish washer to sterilize them. Again, because they are so inexpensive, I recommend buying two, so that you can immediately give them a fresh, clean one while you’re washing and sterilizing the other.
These founts are just small enough that you don’t have to worry about any of the littlest chicks falling in and drowning. I do also recommend, however, that you build or find something to prop the fount up on, so they don’t kick in shavings or poop in it (to be fair, they’re going to poop on everything, but I feel like you can slow it down if you prop it up). Justin Roades recommends building a wooden frame with wire the overtop to put the fount on, so they have to jump up and all the shavings will fall through the wire.
I haven’t built this yet. What worked well for me was a mixing bowl from my kitchen that had a rubber non-slip bottom. It elevated the fount just enough and stuck to the fount just enough that it prevented them from knocking it over.
Related: How to Preserve and Store the Harvest
5. Amprolium to Treat Coccidiosis
Coccidiosis is a common parasite found in all types of livestock. This parasite can cause severe intestinal damage. Amprolium products like Corid can help prevent and/or treat coccidiosis.
Coccidiosis reproduces in warm, damp environments. Unfortunately, baby chicks need very warm environments, and they’re little pooping machines, so it is very easy for their brooder box/coop to become wet. Another benefit of the thermometer/humidity gauge I mentioned above is that you can keep an eye on the humidity.
If you have a chick who has blood in her droppings, is acting listless and not eating, chances are they’re suffering from coccidiosis. It is serious and life-threatening and immediate action needs to be taken if you want to save her. I would rather have Amprolium on hand in an emergency, then have to try to go out and buy some AFTER your chicks start acting sick.
This product is more shelf-stable and can be used on dogs and other animals as well. It’s definitely worth the investment.
If you’re thinking about raising meat chickens (or “meaty tweeties” as a friend of mine calls them) you really need to check out The Grow Network’s movie/documentary on growing meat chickens. They’ve interviewed some of the industry’s leading names (think Joel Salatin) on the best, most humane, the cheapest way to raise chickens for food. I’m so glad I watched it – it definitely gave me the confidence to tackle this project in the Fall.
6. Chick Feed
Naturally, mama chicks will have their babies out pecking the ground for bugs and grasses from day one. But without mama, we have to provide feed. You want to start with a feed specifically designed for chicks. Their stomachs are smaller and their crop is not as developed.
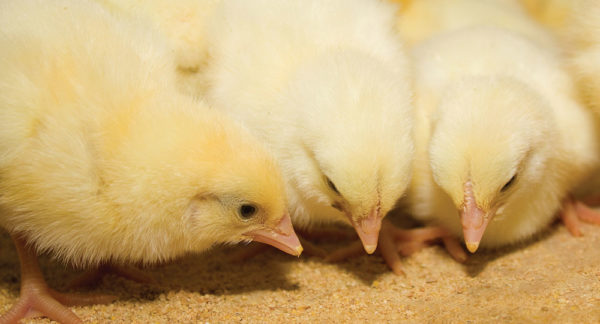
I use this organic chick starter crumble. A note about chick feed: some chick feed is medicated, some is not. That aprolium I mentioned above? It comes in the medicated chick feed to help them build up an immunity to the coccidiosis. However, it is not approved for use in meat animals, so I choose to feed the non-medicated and keep some amprolium on hand for emergencies.
How much feed do chicks eat?
Obviously, chicks will eat more as they grow bigger, but a good estimate is 1 lb of feed per week. Start with this estimate and adjust. If they’re spilling a lot of it and kicking it around, cut back. If they run out quickly and look like they’re eyeing your arm as their next treat, add more.
7. Poultry Feeder
Again, nearly anything will work as a feeder, but I really like this plastic flip-top feeder. It seems to keep the mess down and prevents them from pooping in or spilling their feed. It’s easy to throw in the dishwasher, but if you want something they’ll last longer, check out this galvanized steel one.
The absolute simplest choice is this all-in-one baby chick starter kit. It has everything I’ve listed above (minus a secondary bulb) in one convenient package!
Growing Up
Baby chicks grow up FAST. Before you know it you’ll be planning their move outside to the big kids’ coop. Before you do that, however, you’ll need:
8. Roosts
Your roost could be as simple as a branch that is slightly elevated off of the ground, or a broom handle, or one of these portable plastic ones. Baby chicks will start to roost around 2-3 weeks, so make sure you have something ready for them.
9. A Coop
If you’ve read my other post How to Build an A-Frame Chicken Coop For Around $200, you’ll know I got caught off guard by how quickly my first batch of chicks grew up! I had to scramble and build them a coop in one weekend. Luckily, I found great plans online and was able to build them a HUGE, awesome coop for cheap (with hubby’s help).
If you don’t already have a coop with room for your new chicks, you’ll need to buy one or build one sooner rather than later.


")


")


