


How you doing, fellow preppers? Been a while now since I’ve tried my hand at making stuff, rather than repairing or buying new. Seeing that most of you have trouble figuring out what to use for electricity in case of an SHTF situation, I thought of sharing with you my latest project: a home-made bike-powered generator. It’s very easy to make and seeing that spring’s here to stay; you should definitely consider taking some time off for some tinkering.
I have to admit that I wasn’t too sure about how this project would turn on since I had to improvise most of the time. The idea came from one of dad’s friends who said he used something similar during the Korean War to power a small radio.
So, after doing a bit of snooping on the Internet, I gathered my tools and the rest of the stuff and jumped right into it. Time-wise, it took me about four hours, give or take the time spent chatting on FB with some of the buddies.
Anyway, this little gadget is quite useful if you’re ever in need to juice up something on the spot — I tried it on dad’s old motorcycle and even on an old tablet (you may need to find an adaptor for electronics such smartphones, tablets or laptops). So, without further ado, here’s how to build your own bike generator.
Tools and materials needed
- Hammer with a nail puller.
- Saw.
- Philips screwdriver.
- Lightbulb.
- Old fan belt.
- Old car alternator.
- Switch.
- Battery.
- Voltage regulator.
- Short plank.
- Two 50x6x2 planks.
- One plank (24 inches)
- Nails
- L-corner braces.
- Bendable metal bracers.
- Old bike.
- Piece of metal.
Already gathered your tools and materials? Awesome. Here’s what you’ll need to do next.
Assembling the bike generator
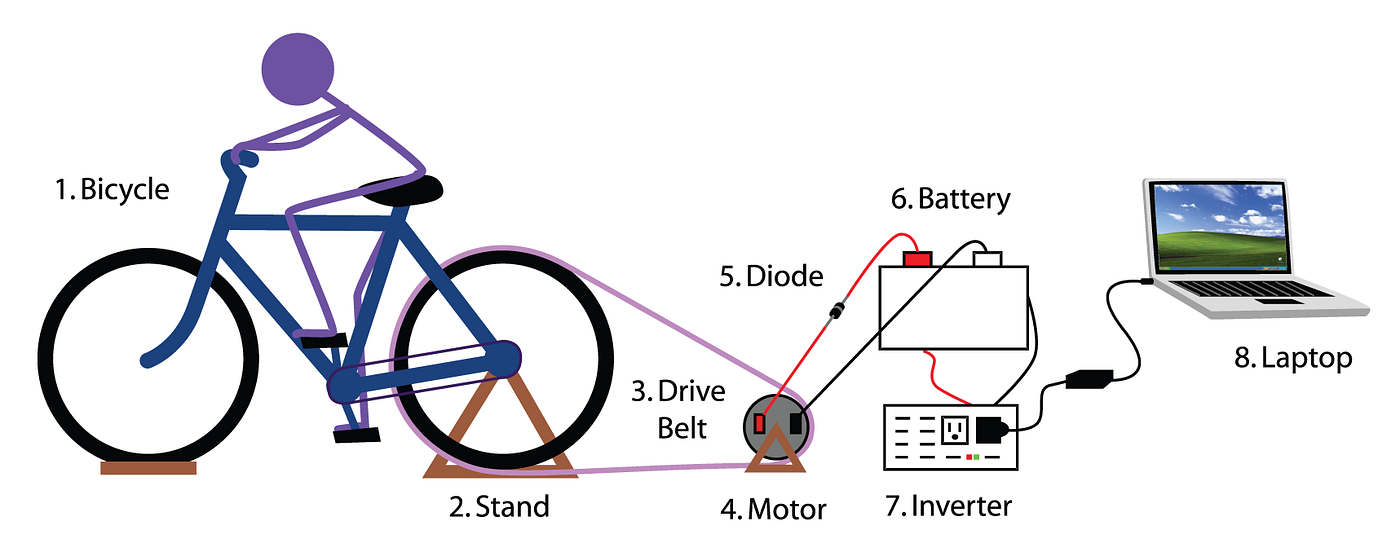
Step 1. Place the two 50-inch wooden planks next to each other on the ground. This will be your base.
Step 2. Grab the saw and cut the 24-inch plank in half.
Step 3. Using the saw, cut two triangular grooves on the upper part of the two pieces.
Step 4. Attach the two grooved pieces to your base (place them halfway from the short edges).
Step 5. Nail the grooved pieces to the base.
Step 6. Attach two big L-corner braces where the grooved pieces meet the base. Use screws to fix them in place.
Step 7. Attach a small L-corner place in the triangle-shaped indentation. Repeat step for the second piece.
Step 8. In order to secure the bike’s front wheel, attach two bendable braces in the front part of the base. Use two screws to lock them in place.
Step 9. Using the appropriate wrench, tighten the screw that holds the bike’s back wheel into place.
Step 10. It’s time to place your bike on the support. Carefully place the back end on the two triangle-shaped indentations.
Step 11. Bend the two front metal braces over the front in and secure into place with two screws.
Step 12. Hop on the bike and start pedalling. If the bike feels like it’s about to go forward, add another metal brace to the front part of the wheel and make sure the rest of the screws are tightened.
Step 13. Remove the bike tube from the back wheel.
Step 14. Install the belt of the back wheel.
Step 15. Attach the other end of the belt on your alternator.
Step 16. Attach the alternator to your base. Keep tension on the belt.
Step 17. Place the piece of metal over the base and attach the alternator to it. You can screw it in place if your alternator has mounting holes or weld it — I’ve gone with the latter option.
Step 18. The alternator has another mounting platform right out the back. Place a thin piece of metal under it and secure in place with a long screw.
It’s now time to test-drive the generator. But before you can do that, you will need to do play electrician for a bit.
- Take the voltage regulator to install it on the alternator. This will allow you to control the energy flow and to add a switch.
- Grab some wires. I color-coded them to know which is which (blue, red, and white).
- Take your read wire and attach it to the motor (this will be on positive).
- Take the blue wire and attach it to the voltage regulator (this will be on negative).
- To install the switch, take the white wire and attach it to the very same spot on the alternator where the red wire went. The other end goes into your voltage regulator.
- Connect the alternator to your regulator.
- Attach the last wire to the DF spot on your regulator.
- Solder the positive and negative wires to your battery. That’s it!
To try out your makeshift electricity generator, take a regular 12-volt right bulb and connect it to your thingamajig (red on side and blue on bottom). Put in a place where you can see it, hop on the bike, and start pedalling. After a couple of spins, the bulb should turn on. However, do keep in mind that the thing will stay on only if you keep on pedalling.
I’ve also tested out this generator on an old tablet. Had to whip out some sort of adaptor. It’s very easy — take your blue and red wires and connect them to the negative and positive terminals of a car charged outfitted with a USB outlet.
Hop on the bike and start pedalling. A couple of seconds later, I saw the charging icon lighting up on the top-right corner of the screen. I know it’s a crude way to juice up electronics, but it’s very handy to have around for, I don’t know, very short phone calls, sending a quick text or checking your mail.
One more thing: be sure that the belt connecting the back wheel to the alternator is always in tension. You might need to reposition the alternator for that. Anyway, hope you’ve enjoyed my little project. As always, feel free to hit the comment section for any insights, tips or just to say ‘hi’.


