


As a prepper, I am always in the wild searching for sources of food. We go foraging for greens, berries, and mushrooms daily. I’m still searching for some of those foods outside the box that I can preserve and have on hand throughout the year, though.
One of those foods is pine pollen. Although it has medicinal characteristics, I simply collect it because of the flavor it brings to some of the dishes I cook. Be aware that being allergic to pine pollen is very likely, so you can try it just a little before you spend hours harvesting it.
I’ll explain how to gather pine pollen in this post, how to store it, and how to cook it with it.
Related: 21 Wild Edibles You Can Find in Urban Areas
Harvesting
You can find a light coating of pollen on your car in May or June, if you have lots of pine trees in your area. The tricky part of harvesting pine pollen is collecting it before the wind blows it all away. Depending on where you live and the temperatures that year, the window for collecting it can vary, but May is usually a good time to check.
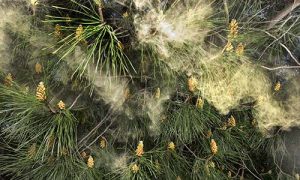
Head to an area in the forest with lots of pine trees. It appears that red pines perform best for this. You will want to see lots of male catkins to decide whether it is time to harvest. When you have entered the harvesting window, they will be yellow and fat with lots of pollen.
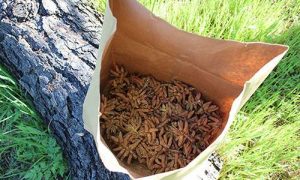
The catkins have to sift the pollen out of them. Drying them first is the safest way to do this. Bring along with you a paper bag and a pair of scissors. Cut the catkins carefully from the tree, but try to restrict yourself to removing 1/3 of them from any given tree. This will guarantee that the tree will stay safe. For a good haul, you’ll want at least one full bag. If you want to do it the old fashioned way, head home and find a cool, dry place to dry the catkins out.
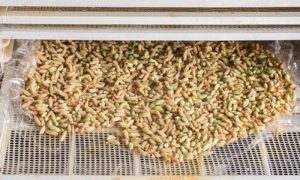
Spread out paper and spread out the catkins to catch the pollen that falls off. Give them a couple of days to dry out. This will not work if they are wet. You’re probably going to end up with mold. Using a dehydrator is the more modern way of drying them out. Place all of them on a tray for at least a few hours, but if they are damp, leave them to dry overnight.
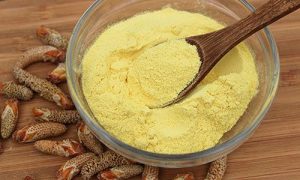
Just put them in a strainer once they are dry, and shake the pollen on a tray to catch it. Make sure the catkins are not crushed. You would think that using a food processor will be easier, but that will leave catkin fibers mixed in with the pollen. You want pure pine pollen. Sift it through the strainer again after you’ve shaken all the pollen loose, just to make sure you’ve gotten rid of any fibers or other debris.
Storage
This section of the process is the most significant. If you do not properly store your pine pollen, its special taste will be lost.
Depending on how long you want to store it, the safest bet is to keep it refrigerated or frozen. To keep air out of the box, double vacuum seal the pollen if you can. Do not place it in a plastic container because it is brittle, and you tend to burn the freezer. When you have a strong seal, you can be able to get away with freezing it in a glass jar.
In my experience you can leave pine pollen in the refrigerator for about a week. However, if the air is removed you can keep it in the freezer for about a year.
Related: 7 Unusual Ways To Use Your Vacuum Sealer
Cooking with Pine Pollen
As seasoning for dishes, I usually use pine pollen in small quantities. Pine pollen contains testosterone, so I try not to go overboard with it. Usually, with stock, salt and some fat, I’ll cook it.
There is not much of a flavor to raw pine pollen. However, it gets an almost cheese-like flavor once you add fat and salt. For a truly local recipe, I like to cook it with mushrooms and greens. You can check out a couple of recipes here to get you started.
Pasta in Pine Pollen Sauce
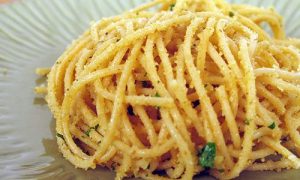
Let it cook for a few minutes and taste. It should have a nice cheesy flavor. If not, add some more and cook for a few more minutes. When the pasta is cooked to your liking, strain it and add it to the pot of sauce. The pasta will absorb the sauce in just a minute or two. Now you are ready to serve.
Creamy Pine Pollen Chicken Thighs

Start by browning all the chicken thighs at 350° F in a pan with oil or in the oven. As it will continue to cook in the sauce, it does not have to be cooked all the way through. On medium heat, get a large skillet and add butter or bacon fat. Then add a small amount of flour and whisk to make a roux. For this recipe, you want it to be just past blond. Stir in the garlic and onions and cook until they are translucent. Now apply a decent amount of heavy cream to taste and add salt and pepper. Add the can of stewed tomatoes and a bunch of fresh spinach.
Add in the chicken thighs once the spinach is wilted and the sauce is a nice pink color. Now sprinkle he pine pollen over the top, cover, and let it simmer for 30 minutes. Serve alone or served over rice or pasta.
Related: How To Repackage Foods in Mylar Bags With Oxygen Absorbers For Long Term Survival
Pine pollen is reasonably easy to gather, as you can see. It is also quick to store it and apply it during the year to your favorite dishes. Do not confine yourself to the two recipes. Any pine pollen can be used for any dish that could use a bit of a cheesy blow.
Hitting the pine groves at the right window is the trick. Before I know the pines are ready for harvest, I usually check around once a week. You can have a large haul and be fine until the next year if you do the same.


