


You probably already know that vacuum sealing your stock is the best, easiest way to keep your food storage fresher for longer. When frozen, the vacuum sealed food can remain fresher for up to 2-3 years without the presence of oxygen, compared to 6-12 months when not vacuum sealed. In the refrigerator, non-frozen vacuum sealed food will last 1-2 weeks, compared to 1-3 days.
From $150 to over $1000, fancy vacuum sealers can vary in price. Not everyone wants to spend that much money on a single-function appliance, and you don’t need an entire machine to seal up your food anyway.
Zip-top bags, which you may already have a surplus of, are the main item that you will need to vacuum seal anything. Use a nice quality bag, maybe one for additional protection with a double-zip. The flimsy cheap ones will work, but as a thicker, better quality bag, they are typically not as fail-safe. Some of the methods require submerging the entire bag in water, and your efforts will be ruined by water penetration from a faulty bag.
There are a number of ways to seal the leftover foods in the vacuum. In this world, you never know when you will suddenly need a surplus of fresh food, but you can succeed if you are prepared.
Related: 7 Unusual Ways To Use Your Vacuum Sealer
The Straw Method
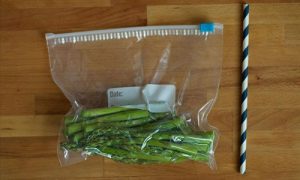
This method uses a zip-top bag and a straw, that’s it. It is an affordable way to vacuum seal, however you may not get as close of a seal using this method.
- Place the food that you would like to save inside your zip-top bag.
- Zip it closed completely, aside from a small opening in the corner of the bag, big enough for your straw to fit into.
- Suck the air out completely through the straw, until there is an even seal inside the bag.
- Quickly and carefully pull out the straw, now allowing any air inside.
- Seal the bag immediately after the straw is out.
The Water Method
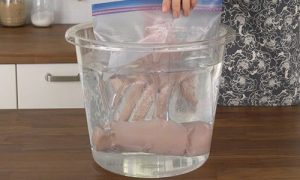
This is the simplest and most effective way to seal your food without a vacuum, and you only need a zip-top bag and a pot or large container of water.
- Fill a large pot or container with room temperature water.
- Add the food to your zip-top bag.
- Carefully seal the bag, leaving an inch of space open.
- Submerge the bag upside down into the water. This creates a vacuum because of the water pressure outside the bag.
- Watch carefully. Before the bag fills with water, seal the bag.
- Pull out of the water and you have a vacuum sealed bag.
The Double-Bag Method
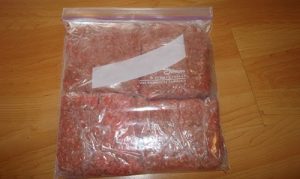
This method is similar to the first one, but with a few additional steps to ensure the items are indeed sealed. You will need smaller, sandwich-sized zip-top bags, in addition to one larger, gallon-sized bag.
- Seal individual portions of your food into the smaller, sandwich size zip-top bags as directed in the first method.
- Open your larger gallon-sized bag and place each smaller filled bag inside.
- Seal the large bag almost completely, leaving room for a straw.
- Place your straw inside the large bag and suck out the air completely.
- Close the bag, leaving a perfect double seal.
Related: 10 Medical Supplies to Stock Up on Before it’s too Late
The Microwave Method
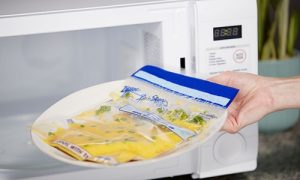
This method uses the microwave to remove oxygen from your zip-top bag.
- Place all food inside the bag that you would like to save.
- Leave a 1-inch opening at one end of the bag, seal up the rest.
- Microwave on high for 20-30 seconds.
- Carefully remove the heated bag from the microwave, being cautious to not burn yourself in the process.
- Quickly seal up the bag upon removing, as to not let any air inside.
- Store in the appropriate place when finished.
Some Helpful Tips:
Sealing dry foods is different from sealing wet items, such as soup or other leftover stews. All the above methods will work for both dry and wet foods, however wet foods are slightly more complicated.
To combat that, seal any wet foods in this manner:
- Fill the bag about halfway full, leaving about 1-2 inches of headroom at the top.
- Press out as much air as possible with your hands.
- Press the seal almost all the way closed, leaving about 1 inch open in a corner.
- Lift the bag off of the counter and press it against the edge of the counter at the food’s water line. All the liquid will be hanging below the counter, while the air and top of the bag is above.
- Be sure there are no air gaps in between the liquid line and the top of the bag.
- Lay the top completely flat, ensuring there is no air.
- Seal the bag completely while it is still laying flat.
Vacuum sealers are a fantastic kitchen tool to have, but it requires very little time and patience to seal on your own. There are several different ways your food can be sealed. Liquid seals need a little more TLC to ensure that the material does not leak out. Think about investing in various sizes of zip-top bags to save money on wasted groceries, and you will still have an at-home way to vacuum your food.


