


Canned and preserved foods can be found in most prepper’s pantries. And they’ve also been popular in survival packing.
However, the use of canned foods for survival kits has a couple of drawbacks.
One is their size and bulk, that takes up a lot of space. That makes use of considerable space and energy when packing and traveling with that kit.
Another issue is that once opened, you need to consume canned items rather quickly before going bad, especially if you don’t have refrigeration access.
That will lead in a short time to consume larger than desired amounts of the same item, or many goes to waste.
MRE packs (Meal ready to eat) are an excellent alternative to canned and preserved food. They are compact and often lightweight, which makes it much easier to store, pack and carry.
And the long shelf life is not ending, simply because you are opening the main package. I say “the main package” because typically a homemade MRE will consist of a lot of small packages within a large package.
Because of all this and because they are easy to prepare, MREs are used not only by preppers but also by federal and military disaster agencies.
Choosing Items for Your MREs
One thing to keep in mind is the nutrients. Put a balance of proteins and carbohydrates in each bag. You’ll want to keep both of them to sustain you throughout the day.
If your pack is for a meal, the target should be around 1,000 calories. That may sound like plenty of calories, but if you’re in survival mode, you could quickly burn through those. Note, you can quickly save anything you don’t eat when you prepare it right, for later.
Another consideration has to do with shelf life. Pick items you know will last a long time before they open. Now every bag can be for one meal or one day.
So, after opening no need to worry too much about it having a long shelf life. Just make sure that nothing calls for refrigeration.
Preparation is also key when it comes to choosing foods to put into your MRE. You are not going to want to put in items that need cooking. You could get lucky and be able to cook over a campfire. But don’t rely yourself on it.
So the best options are the ready to eat food. Some foods taste better when dry, but need no cooking. Those foods to put in the pack are fine.
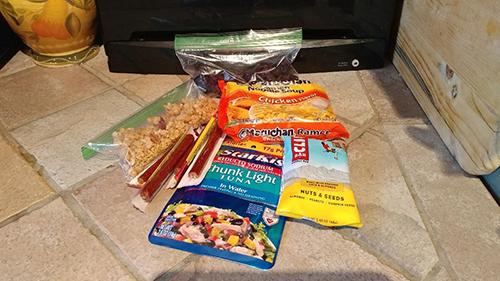
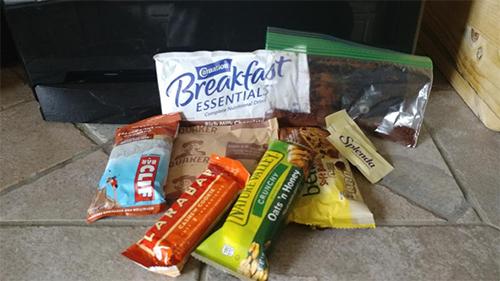
It will come down to your own personal taste other than the above, but here are a few options to consider when making your own homemade MREs:
- Instant Ramen Noodles – A pack is lightweight, it has a variety of flavors and needs only water.
- Instant Oats – They are a great source of fiber, and need only water
- Jerky – Good protein and flavor source. Many jerky can be expensive. Slim Jim sticks are a less expensive alternative which are individually packaged (another perk!).
- Dried Fruits – Raisins and other dried fruits like cranberries, cherries, and blueberries are nutritious and add a punch of flavor.
- Crackers – By adding calories these make a good filler, and can be a nice substitute for bread for other foods.
- Tuna – Small tuna packages are lightweight, have a long shelf life, are easy to eat, and represent a great protein source.
- Granola or Energy Bars – Easy to eat and great for adding fiber, nutrients and protein. There is also no requisite preparation.
- Candy – Add a bag of M&M’s, Skittles or a candy bar if you like sweets. This is not intended to replace an energy bar but rather to satiate a sweet tooth. The added sugar boost could also be a good thing. Just make sure that is just a little extra.
- Seasonings and Condiments – Add small seasoning packets such as salt , pepper, or sweetener, as well as condiment packets that you can save from a meal out. They are easy to pack, and can add to your meal some flavor.
- Dried Instant Beverages – Instant coffee, dried milk, tea bags, and powdered protein shakes can all be added in small packets; water is only needed.
Other packaged products from the supermarket can be regarded as having a good shelflife, such as Hormel ready to eat meals. Only remove the pack from the exterior box to save space.
If you have time to prepare them, homemade items are a great option. Here are a few good ideas which will add a good balance of calories and proteins, as well as survival nutrients:
- High-Calorie Ration Bars
- Dried Plums or other Fruits
- Bean and Rice Soup Mix
- Matzo Bread or Hardtack Dried Meats, such as Jerky or Pemmican
There are items that are not edible to consider throwing into your MRE so they are readily available to use every time you open a pack.
If this helped with the other things in your bag, I would consider throwing in the following:
- Matches
- Wet wipes
- A utensil
Get creative with your choices, because there are plenty of options.
Related: 59 Long-Term Survival Foods and Supplies from the Grocery Store
Putting Your MREs Together
Group the things you select in a way that offers a full meal, bearing in mind that for a survival scenario there should be at least 1,000 calories, and a decent balance of carbohydrates, protein and vitamins / minerals. Make each pack a little different so your meals won’t be the same.
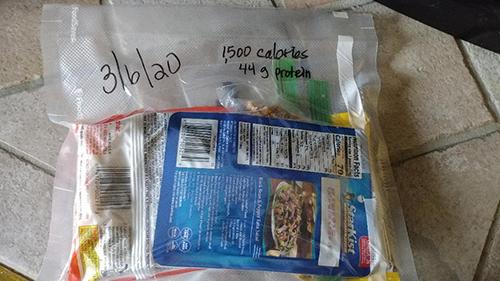
Also note the expiry dates, keeping them in a similar pack.
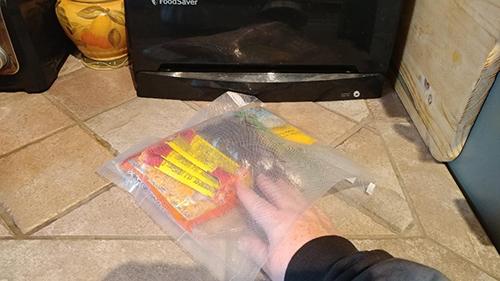
Put each grouping of MRE in a plastic bag that can be used with a vacuum sealer. The sealer is helping not only with freshness but also with space. Speaking of space, some pre-packaged products, such as instant ramen, should be slightly pierced to let the air out before sealing with vacuum. It would however be messy to do that with a tuna pack.
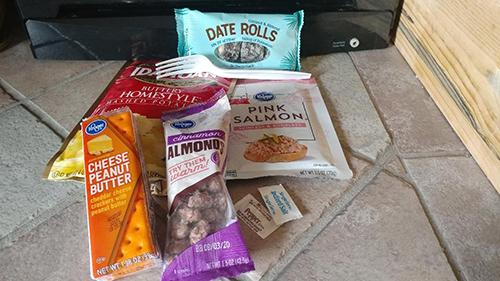
Lunch:
To sum up, sealing your MREs with a vacuum will help freshen them. It will also make it more portable, making it easier to store. Just select ingredients that will have a shelf life of at least 6 months for a year. Open and enjoy, rather than waste them, if they approach the expiry date. Then, make new packages to be prepared at all times.
Related: 12 Long Shelf Life Foods You Should Know About


